Tuesday, September 30, 2008

Ready to varnish


Here is the floor ready to varnish and stain. Didn't take to long to get the rest of the wood strips down.

Parquet any one?


I have been working on the parquet floor design and it's coming along. As you can see the center part is done, and now I am adding the wood floor surrounding the design. It was easier to do it on a black card stock paper, and finish it this way, then I'll glue it down to the subfloor.
Isn't it getting exciting? And it's coming along quickly now.

And now the floors


The next thing I needed to do was to extend the edge of the floor to the edge of the pumpkin and gourd. I tried to do it when I cut the floor, even making a paper template so it would fit right. However, that didn't work completely, and I was left with a gap at the edges. So, I have used paper clay to fill in the gap. When it dries, it can be sanded smooth. Then, the parquet flooring can be extended over it. In the gourd, I will paint the edge as near a color as I can get, to make it look like that was the edge of the gourd.
  I had to weight down the floor in the pumpkin to make it be where it needed to be.
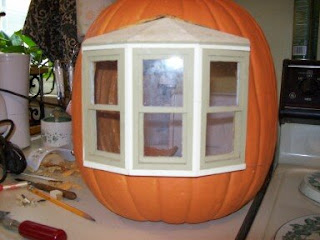
  I have also fitted the bay window a bit better and it's ready to be set in, which leaves me with how do I get these two pieces to fit together smoothly but let me remove one so I can get back inside. I will be trying out a couple of things next and hope I find an answer.
  I will need to get things set up so I can begin the decorating and landscaping. That will be a whole project in it's self. And I need to get back to the fairies. Still lots to do.

Monday, September 29, 2008

Painting the door and windows


Today I painted the door and the windows, a nice orange and red color, to go with the pumpkin.
I will have to do some sanding and some clean up before I can glue the frames together, then I can cut the front door and window openings. I may work on the paper clay area around the sub-floor. Still a whole lot to do yet. But the ideas are coming together, and I'm getting a real feel for the ballroom. What do you call a ballroom where a "grand promenade" will be held? 
I'll have to think on that.
Well back to work.

Sunday, September 28, 2008

Fire-Flies!

One of the things I wanted to add to my little ballroom and with the landscaping outside.... was fire-flies. I have been tracking all over the net to find someway to get this to happen. Now I think I have found what I need to create fire-flies. And yes they will twinkle like the real thing.
When I get the supplies in and begin work on them I'll add that to this tutorial as a thank you for all who have come to see what is happening in the ballroom.
  I have been doing some creative thinking, to come up with ideas for this project. I was thinking, mainly in terms of getting it in one piece, then.... I realized the fairies would want it decorated. So how far do you go? Really fairyland or add some of people things? I don't want the bloody stuff, as I'm not into vampires and goth. But the fun things, that would makeup my kind of fairyland, fantasy. You may of course use what you see here that you like, for your own version.
  I can't believe I found the fire-flies supplies, and I can't wait to work them out. So while I'm waiting for the supplies to come in {yes mail order} I will go back to the other problems.
I am going to add paper clay to the bottom of the pumpkin and gourd so the sub-floor will lay flat and fill in the corners and edges. That way when I put down the parquet it will have something to lay flat on.
  I have been finding and ordering little things for the inside like a punch bowl{lovely shade of green}, a wonderful mirror with a lady on a crescent moon {so the fairies can check their hairdo} and a wonderful little set of pumpkins, with a pair of rats eating their way into them {it's not gross, quite cute in fact and rats get hungry also}.
  Tonight I will be working on the cutest little frog, who will have found his way into the ball, and will be looking most hopefully up at a lovely fay lady. I wonder if he'll get his kiss, and will he change back into a prince or will he remain just a toad?
  I will add that to the instructions here so you can make your own little frog.
  I hope you have found a way to make your fairies, as I am working in a couple of different mediums for mine. It would have just taken to long to add that, so do try a search on google.
  Well, lots of other things are in the works, and I shall be moving quickly now. Come back often to see what's new.

Friday, September 26, 2008

Sub-floor


Tonight I got the sub-floor cut out and fitted to both pieces. A bass wood sub-floor for the ballroom, as I plan on creating a parquet design under the chandelier. The Anti-chamber has a lovely redwood floor, and only needs varnish. I need to mark where the floor is in both pieces, but the anti-chamber needs a hole where the door will go. I also need to mark where the windows will be. I still have to glue both windows and door frame together, as I needed to do some cutting down in order for them to fit.
  I also need to paint. Windows, door, some furniture.... lots left to do. The drapes need to be made. There is a list yet. I also need to get back to the fairies and get them dressed.
Well, onward....

Thursday, September 25, 2008

Books


I'm not sure if anyone has thought of this or it's been done, but I would like to add it here, for any who need the info. It is something I thought up, that one could do to enhance the little ready made books you can buy in groups for so little.
  I print out book covers, in different styles, and colors, in one twelfth scale. Let them dry really well, so the ink doesn't run. Then cut them out. You will have a little pile of miniature books, and a little pile of miniature book covers. Don't worry about if the cover are big enough to cover the books now.
  Choose a book and fit a book cover to the outside of the book. It's alright if it's too big and a little small will also work. Match the spine only to the book, and fold the cover around the book.
When you have a nice crease on the book spine, then lay the cover down and spread a fast drying white glue on the blank side. Line up the spine and press the cover around the book. If it's too big you will cut down the cover only, by trimming along the inside edge of the book cover, after it's dried well. If it's to small you can trim down the whole little book or, leave it as is, or trim just the exposed cover edge.
  When all are dry and trimmed, you can line them up, spine out on your book shelf and they will look for all the world like the old classical additions as they came out in the 1800's. See what I mean?
  There are two other books there that need a whole other how too, so another time I'll add that. Hope this helps a little. Enjoy!
Oh, if you want you can write inside the little blank books, or draw, or whatever. Or just leave them blank.

Monday, September 22, 2008

Fairies


Late today I started on a couple of the fairies. These are made of Pro Clay. As with all things done by hand I can't tell you how to sculpt as there are many tutorials out there on the subject, that would do it far better then me. So do a search, and pick your preferred method, and clay.
  The one that is sitting, will be atop the pumpkin stem, listening to the music. The other one will be inside dancing, with the other guests. The diminutive fairies can be just as formidable as their larger cousins. Never take one for-granted.
  They two are not done yet, but I made a good start on them today. Now, onward to bed!

The bay window


This bay window is going into the back wall of the ballroom so one can look into the ballroom without bothering the occupants inside and view what is going on. I cut the hole out so that it would fit as tight as it would without having it extend inside the ballroom.
  It will next have to be painted and then glued into the pumpkin back wall.
At present, I am working on the front door and the two windows for the anti-chamber. They have all had to be made smaller, and that is no easy task.
When I have the door trued up and glued together, I can mark off where it will be and cut the opening for it, and then the two windows, one on each side of the front door, in the anti-chamber.
Depending on what you have to work with {two pumpkins, or gourds} and the size of them, will determine the side of your doors and windows. I didn't want them to over-shadow anything else, so I have made mine a bit smaller.
{Just as a quick note, the back bay window will have to remain out for awhile so I can get at things through that opening, and you might want to do the same. I have a sub floor and then the parquet floor to put in before I close off my avenue of access. I am also going to have to open a hole for the wires for the chandelier and the scones. I am still working out the idea of how to put the front onto the back and make it so it opens, and I'll have access to the inside. A must if I need to change a light bulb.
Anyway, it's coming along again.

Sunday, September 21, 2008

Sanding!

I'm back. Sorry it's been awhile, but lots to do outside to get ready for winter. Also, trying to clean the last of the stuff out of the house into the sheds, that needed to go back out.
  Now the next thing I will be doing is sanding out the inside of the gourd. I will measure the door, and the windows so I can cut an opening for them {and lets hope this time I don't set it on fire.}
  Then I will be varnishing the inside and measuring the floor area for the subfloor. I will also be measuring out {in the pumpkin} where the bay window in the back will go, and the measuring for the subfloor. I will also be marking off where that center circle will go on the floor in the ball room. Then I want to see and mark where the lights will all go, and make the holes to thread the wire though. I am also marking off where the two pieces will fit on the plywood, so I can plan the outside design.
  If I can I want to make the gourd stable and solid, and the pumpkin movable so I could be opened there. More then likely I'll have to get very creative with a vine going up the side and "knitted" onto both to make a hinge. But I think that will work.
Wait till you see what is coming from England for the ballroom, and what I am working on for the fairies. I hope this stirs up some creativity out there and there will be a whole pumpkin
 patch of these ball rooms come this Halloween?

Sunday, September 7, 2008

pictures of the two.


So here they are the promised pictures of todays job. The pumpkin open shows a really nice wall to work with. The hole in the floor will be covered up by the subfloor when it goes in. The big picture of the gourd shows all the tiny burn marks. I'll have to do some sanding here, and some of them may be lost, but some I'll bet will stay. I will more then likely varnish the inside of the gourd to protect it and give it a better natural looking finish. The two together almost look like one is swallowing the other right now, but that will change when I start to finish the outside., with steps and mortar to "seal" the two together. I am going to try to find some kind of hinge that will allow me to open the back, at the seam when the to come together. That way I can get inside to change light bulbs etc. All in all it was a good days work so far. Now I need to spend some time thinking thought some things. I don't want to mess things up at this point from jumping in to quickly and ruining it all. I love the way the two colors come together and seem to be naturally there. I plan on leaving the gourd "natural", as it's such a pretty color.
Well onward, and lets hope the dark fairies like what they see,
Oh by the way, when I say "dark fairies" I don't mean the mean ones, I mean the ones that come out after dark, and after moon rise. Like fireflies, and moon moths.

Supplies, for "The Dark Fairies Promenade".

I have not given a list of supplies as you might decide to do things differently. For instance, you might want to use two pumpkins, or you might find a different item that will work best for you.
This tutorial is the idea and how to for what I am creating. You are welcome to change, add to, or delete any part you don't like or want to do.
  I have started with a large carve-able pumpkin from JoAnn's. I had a large gourd stored away, and decided to use it. I also have a large square piece of thick plywood, that I will be using for the ground/base to set this up on. To make it look nice I will be trimming out the edges with a nice decorative band of wood I got from Home Depot some time back. It will let me landscape the surrounding area, and keep it in one piece. {If the little black fur ball will leave it alone.}
  I also have some small rocks and cement, stored for another use and will be using some of it, to build up a base under the gourd, to bring it up level with the pumpkin base on the inside. I will have to get very crafty to fill in the crakes along the sides of the gourd where it fits against the pumpkin. But as fairies would have any number of things to use, I'm sure I will figure that out also.
  I will be cutting a thin piece of bass wood to fit on the floor of the ballroom and the anti-chamber gourd. There may be a small step down into the ballroom, but that I'm not sure about yet. This will make up the sub floor as I have a wonderful parquet circle that will go under the center stem of the pumpkin ballroom. I also have a 14 arm chandelier coming that will hang right above this, and light the ballroom. I plan on having drapes that will also hang from the center of the stem, down and outwards to the walls. There will also be two sconces on the wall of the anti-chamber.
  On the back wall will be a bay window so you may look in on the grand promenade without disturbing anyone. The main entrance will be through the front of the gourd. I will have to make steps to accommodate the higher level of the floor, and I see wide curved ones, kind of curving around the front, and a wide area one would walk across to entry though the door.
The door and the windows in the anti-chamber as well as the bay window, were contributed by a dear friend, who has a wonderful shop on ebay.
  Go and take a look. He has just about everything you will ever need, and if he doesn't carry it.  he will get it for you. Look him up on ebay under The DIY Dollhouse Center. Ken is great to work with. You can't find better people.
  I am trying to decide if the fairies transported the pumpkin and gourd to fairyland, or they are using it in our space and time. I guess it really doesn't matter, except for ones own personal thoughts and ideas. A little input would be nice here. Any ideas, anyone?
 I'll add to what you might need as I go along and things evolve. I will also be posting pictures as this will help you to understand better what I'm doing, how it's done, and what you will need to do it.
More later, I'm waiting on the batteries to charge.
Deirdre


It did what?

Well, today I decided to open up both the pumpkin and the gourd. I pulled out my trusty Dremel tool and was going at it on the gourd. {This is not for kids, and if you use one be very, very careful,  as they tend to jerk off in a direction other then you indented.} Well, I finally got it cut all the way around., and pried it open, only to see something rising in the air. I had been warned about mold inside, So I stuffed into a garbage bag and took it outside.
 Then I pulled it out and opened it up, to find..... it was on fire! Smoking away like a bad cigar. I'm trying to pry out the soft stuff that was burning but the fire started to move faster then I could. So I grabbed the cats water dish and dosed the inside. It went out, and then I took a garden tool and started to scrape out the mess. 
  Well, long story short, I'm sure the fairies will come up with a suitable story as to why there are little burn marks up the wall. And I'd like to hear it.
  So... you are welcome to post your ideas as to why, and the best will be added to this blog's story and tutorial.
  I need to charge the batteries to my camera, but pictures will follow.
Have fun,
Deirdre

Friday, September 5, 2008

I found something...


I found a gourd, that would be large enough to make an anti-room to the pumpkin ballroom.
The gourd would be sealed against the pumpkin, and french doors would open into the ballroom, from the gourd. The front door would be in the gourd, with a pathway of gray paver stones leading up to it. There would be enough room around them to landscape.
  I received some wonderful treasures for this project from a friend. Now my mind is jumping in so many directions, and I need to settle on one, and dig in. I have so many ideas. But first, now will be to open up the back of the pumpkin and the gourd, so I can get inside them and see what I will have to work with on the walls.
  I need to locate some fabric as well.{a trip out to the sheds}. Anyone know how to make tiny black feathered crows?

Monday, September 1, 2008

Just for fun!


I was at JoAnn's the other day with my trusty coupon in hand, and came home with one of those large carve-able pumpkins they come out with at this time of year. I have had plans for one of these big ones, since last year, and they were out before I could get one.
  Where did all these mice come from? I don't have any ashes to clean. Hay, she went that away.
  I will be posting a How-To on what I'm about to create. Come and join me as I work my way through this project. I hope you try one as well. One- twelve th scale here we come.
  Funny how that "drink me" bottle is never empty, but it's fast acting, so as I shrink in size take a look at this pumpkin.